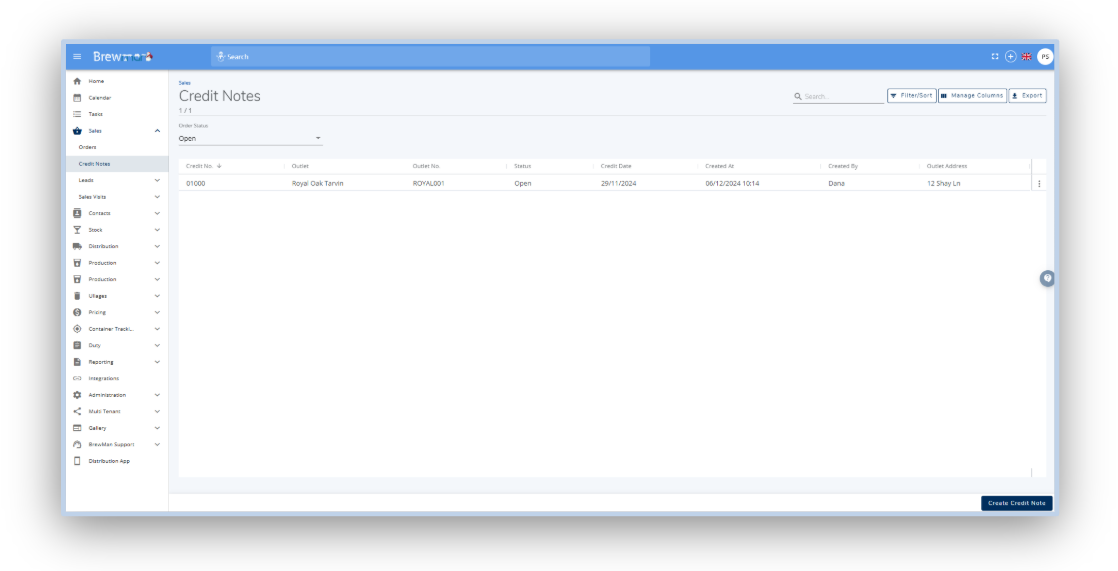
Here you will see a list of all the previous Credit Notes created. To create a new one, click Create Credit Note in the bottom right of the screen.

Create Credit Note
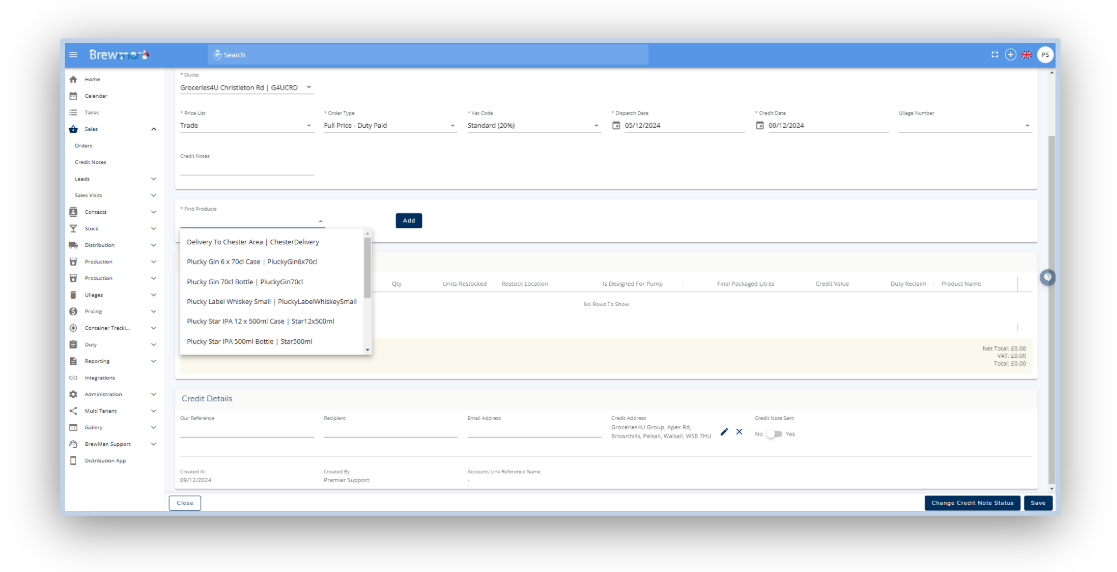
Any field with an asterisk (*) is mandatory and needs to be filled out.
Select Outlet - Choose the Outlet you wish to credit. The Outlet must already be in the system.
Price List - This is automatically set to the Outlet's default option. However, you can change it using the dropdown list.
Order Type - This is automatically set to the Outlet’s default option. However, you can change it using the dropdown list. This will ensure any Duty credited will be in the correct box on your Duty Return. Select from the following:
Export - Duty Suspended
Full Price - Duty Paid
Full Price - Duty Paid Elsewhere
Price Excluding Duty - Duty Suspended
Dispatch Date - This date is used to decide the Duty Rate. The Duty Rate applicable on this date will be used for the Credit.
Credit Date - The date of the Credit Note and any Duty reclaimed will be on the Duty Return for that date.
Be aware that the Credit Date should not fall in a period of any previously closed Duty Return if the Duty Return has already been sent to HMRC.
Now, Find Products you wish to Credit using the drop-down menu. If the credit is not against a specific Product you may wish to set up a ‘Credit’ Product to be used.
Click Add. You will then need to fill in the details of the order line.

Add Line:
You will need to check the List Price that has been auto-filled as well as the Discount Price , making any changes required, especially if the Outlet uses cumulative discounts. Then enter the Quantity.
Once adding this information you can then choose whether the item(s) are to be Restocked..
If the Products are to be Restocked , select the Stock Location you wish it to be returned to and enter the Quantity. The Products will come back in Stock once you post the Credit Note to Accounts. You can check this by going Stock → Stock Transactions once it’s posted.
Once you have finished adding the details, click Save.
Next, fill in the follow details:
Once you have filled in all the information, click Save.
You can now click to Preview the Credit Note, Go to Outlet or Email Credit Note.
The email address used will be the one provided in the Credit Details section. Once clicking Email Credit Note , you can check if it’s successful in Email Audit. This is found by going to Administration → Email Audit.
Once you have added all the details you wish to the Credit Note you can Close the page using the button in the bottom left corner. You can go back and edit this at any point as long as the status is Open.
Completed and Post to Accounts
When you wish to Post the Credit Note to Accounts you will first need to mark it as complete. To do so, go to Sales → Credit Notes and click on the 3 dots under the Actions column for the Credit Note you wish to complete.
Once you have marked the Credit Note as Complete you will no longer be able to edit it unless you go back and mark it as Uncomplete. When the Credit Note is marked as Complete you will be able to see it ready to post to accounts by going Administration → Accounts Posting → Transactions.
Once the Credit Note is Posted to Accounts you will not be able to make any edits to it. If products were to be Restocked after Posting to Accounts you will see evidence of it returning by going to Stock → Stock Transactions.
Was this helpful?
Comments
You must be logged in to comment in this article.
Login to comment